HTML canvas 绘制文本时不支持换行,一般情况下可以通过 html2canvas 解决复杂的文本排版,但 html2canvas 不能在小程序或 Node canvas 环境下使用。
这篇文章介绍了 canvas 文本渲染的基础知识、贪心算法实现自动换行、Unicode 换行算法/CSS 标准中的换行以及 html2canvas 能够正确渲染文本换行的原理。
基础知识
这章将介绍 canvas2D 文本绘制的一些基础知识,如果你对这些已经很熟悉可以跳过。
Canvas2D 环境中,可以使用fillTextAPI 来绘制文本。该 API 的语法如下:
void ctx.fillText(text, x, y [, maxWidth]);text是所要绘制的字符串,x和y为文本起点的坐标,可选参数maxWidth为绘制的最大宽度。
如果指定了 maxWidth,绘制字符串实际渲染长度超出maxWidth时,文本会进行自适应缩放。
可以在下面的示例中体验三个参数的作用。
fillText
<div class="wrap">
<canvas id="canvas" width="900" height="300"></canvas>
<form id="form">
  <label>font</label>
  <input id="font" value="48px serif"/>
  <label>text</label>
  <input id="text" value="Hello World"/>
  <label>x</label>
  <input type="range" id="x" name="x" min="0" max="300" value="36"/>
  <label>y</label>
  <input type="range" id="y" name="y" min="0" max="100" value="63"/>
  <label>maxWidth</label>
  <input type="range" id="maxWidth" name="maxWidth" min="0" max="900" value="900"/>
</form>
</div>
.wrap {
display: flex;
flex-direction: column;
}
#canvas {
width: 300px;
height: 100px;
border: solid 1px #000;
margin: auto;
margin-bottom: 10px;
}
form {
display: flex;
flex-direction: column;
}
input, label {
margin-top: 10px;
width: 300px;
margin: auto;
}
var canvas = document.getElementById("canvas");
var ctx = canvas.getContext("2d");
ctx.scale(3,3);
// ctx.font = "48px serif";
// ctx.fillText("Hello world", 50, 100);
const paint = (ctx) => {
ctx.clearRect(0, 0, 300, 300);
const font = document.getElementById('font').value;
const text = document.getElementById('text').value;
const x = document.getElementById('x').value;
const y = document.getElementById('y').value;
const maxWidth = document.getElementById('maxWidth').value;
ctx.font = font;
ctx.fillText(text, parseInt(x), parseInt(y), parseInt(maxWidth));
ctx.font = '15px sans';
ctx.fillText(`x:${x} y:${y} maxWidth:${maxWidth}`, 10, 90);
}
const form = document.getElementById("form");
paint(ctx);
form.addEventListener('input', () => paint(ctx));fillText仅支持绘制单行文本,文本超出绘制范围仍然会继续绘制,而\n也会被视为空白字符。幸好 Canvas2D 还提供了mesaureTextAPI,语法如下:
ctx.measureText(text)参数text为要测量的字符串,该方法会返回TextMetrics对象,TextMetrics对象包含width属性。通过这样的代码可以测量指定字符串绘制后的宽度。
measureText 测量文本宽度
<div class="container">
<canvas id="canvas" width="600" height="150"></canvas>
<div class="controls">
  <label for="textInput">输入文本:</label>
  <input type="text" id="textInput" value="Hello World" />
  <label for="fontInput">字体设置:</label>
  <input type="text" id="fontInput" value="24px serif" />
  <button id="measureBtn">测量宽度</button>
</div>
<div id="result"></div>
</div>
.container {
padding: 20px;
font-family: sans-serif;
}
#canvas {
border: 1px solid #ccc;
display: block;
margin-bottom: 15px;
width: 100%;
height: 50px;
}
.controls {
display: flex;
gap: 10px;
margin-bottom: 10px;
flex-wrap: wrap;
}
.controls label {
display: flex;
align-items: center;
gap: 5px;
}
.controls input {
padding: 5px;
border: 1px solid #ccc;
border-radius: 3px;
}
#measureBtn {
padding: 5px 15px;
background: #007bff;
color: white;
border: none;
border-radius: 3px;
cursor: pointer;
}
#measureBtn:hover {
background: #0056b3;
}
#result {
padding: 10px;
background: #f0f0f0;
border-radius: 3px;
font-family: monospace;
}
const canvas = document.getElementById('canvas');
const ctx = canvas.getContext('2d');
const textInput = document.getElementById('textInput');
const fontInput = document.getElementById('fontInput');
const measureBtn = document.getElementById('measureBtn');
const result = document.getElementById('result');

ctx.scale(2, 2);

function measureAndDraw() {
// 清空画布
ctx.clearRect(0, 0, 300, 75);

const text = textInput.value;
const font = fontInput.value;

ctx.font = font;
ctx.textBaseline = 'middle';

// 测量文本
const metrics = ctx.measureText(text);
const width = metrics.width;

// 绘制文本
ctx.fillStyle = 'black';
ctx.fillText(text, 10, 37);

// 绘制测量线
ctx.strokeStyle = 'red';
ctx.lineWidth = 1;
ctx.beginPath();
ctx.moveTo(10, 50);
ctx.lineTo(10 + width, 50);
ctx.stroke();

// 绘制起止标记
ctx.beginPath();
ctx.moveTo(10, 45);
ctx.lineTo(10, 55);
ctx.moveTo(10 + width, 45);
ctx.lineTo(10 + width, 55);
ctx.stroke();

// 显示结果
result.innerHTML = `var metrics = ctx.measureText('${text}');<br>
metrics.width = ${width.toFixed(2)}px;`;
}

measureBtn.addEventListener('click', measureAndDraw);
textInput.addEventListener('input', measureAndDraw);
fontInput.addEventListener('input', measureAndDraw);

// 初始化
measureAndDraw();
使用贪心算法实现自动换行
自动换行的简单实现是使用贪心算法,核心思路是将尽可能多的字符放入一行,直到所有的字符都放进去。
按照这样的思路将文本处理为换行后的字符串列表,列表中的每一项都代表实际渲染的单行文本,最后再调用fillText依次渲染即可。
贪心算法基础实现
<div class="container">
<div class="input-section">
  <label for="textArea">输入文本(支持换行符):</label>
  <textarea id="textArea" rows="3">Hello World! 这是一段测试文本,用来演示贪心算法的自动换行功能。
可以输入多行文本,算法会自动处理换行符。</textarea>
  <div class="controls">
    <label>最大宽度: <input type="range" id="widthSlider" min="100" max="400" value="200"> <span id="widthValue">200</span>px</label>
    <label>字体大小: <input type="range" id="fontSlider" min="10" max="24" value="14"> <span id="fontValue">14</span>px</label>
  </div>
</div>
<div class="output-section">
  <div class="canvas-wrapper">
    <canvas id="canvas" width="900" height="600"></canvas>
  </div>
  <div class="debug-info">
    <h4>算法调试信息:</h4>
    <div id="debugOutput"></div>
  </div>
</div>
</div>
.container {
padding: 15px;
font-family: sans-serif;
}
.input-section {
margin-bottom: 15px;
}
#textArea {
width: 100%;
padding: 8px;
border: 1px solid #ccc;
border-radius: 4px;
font-family: sans-serif;
margin: 5px 0;
}
.controls {
display: flex;
gap: 20px;
margin-top: 10px;
}
.controls label {
display: flex;
align-items: center;
gap: 8px;
}
.controls input[type="range"] {
width: 100px;
}
.output-section {
display: flex;
gap: 20px;
}
.canvas-wrapper {
flex: 1;
}
#canvas {
border: 1px solid #ccc;
width: 100%;
height: 200px;
background: white;
}
.debug-info {
flex: 1;
padding: 10px;
background: #f5f5f5;
border-radius: 4px;
font-size: 12px;
max-height: 200px;
overflow-y: auto;
}
.debug-info h4 {
margin: 0 0 10px 0;
font-size: 14px;
}
#debugOutput {
font-family: monospace;
white-space: pre-wrap;
line-height: 1.4;
}
const canvas = document.getElementById('canvas');
const ctx = canvas.getContext('2d');
const textArea = document.getElementById('textArea');
const widthSlider = document.getElementById('widthSlider');
const widthValue = document.getElementById('widthValue');
const fontSlider = document.getElementById('fontSlider');
const fontValue = document.getElementById('fontValue');
const debugOutput = document.getElementById('debugOutput');

ctx.scale(3, 3);

// 计算文本应当在何时换行,返回换行处理后的字符串列表
function calculateTextWrapLines(ctx, text, maxWidth) {
let lines = []
let words = text.split('')
let line = ''
let debugInfo = []

for (let i = 0; i < words.length; i++) {
  const word = words[i]
  const testLine = line + word
  const { width: measuredWidth } = ctx.measureText(testLine)

  if (measuredWidth > maxWidth) {
    debugInfo.push(`行 ${lines.length + 1}: "${line}" (宽度: ${ctx.measureText(line).width.toFixed(1)}px)`)
    lines.push(line)
    line = word
  } else {
    line = testLine
  }
}

if (line.length) {
  debugInfo.push(`行 ${lines.length + 1}: "${line}" (宽度: ${ctx.measureText(line).width.toFixed(1)}px)`)
  lines.push(line)
}

return { lines, debugInfo }
}

// 调用换行处理函数处理文本换行
function fillTextWrap(ctx, { text, x, y, width, lineHeight }) {
const paragraphs = text.split('\n')
let allLines = []
let allDebugInfo = []

paragraphs.forEach((paragraph, pIndex) => {
  if (paragraph.length > 0) {
    const { lines, debugInfo } = calculateTextWrapLines(ctx, paragraph, width)
    allLines.push(...lines)
    if (pIndex > 0) allDebugInfo.push('---')
    allDebugInfo.push(`段落 ${pIndex + 1}:`)
    allDebugInfo.push(...debugInfo)
  } else {
    allLines.push('') // 空行
  }
})

// 绘制所有行
allLines.forEach((line, index) => {
  ctx.fillText(line, x, y + index * lineHeight)
})

// 绘制边界线
ctx.strokeStyle = 'rgba(255, 0, 0, 0.3)'
ctx.lineWidth = 0.5
ctx.beginPath()
ctx.moveTo(x + width, y)
ctx.lineTo(x + width, y + allLines.length * lineHeight)
ctx.stroke()

return allDebugInfo.join('\n')
}

function render() {
const text = textArea.value
const maxWidth = parseInt(widthSlider.value)
const fontSize = parseInt(fontSlider.value)

widthValue.textContent = maxWidth
fontValue.textContent = fontSize

// 清空画布
ctx.clearRect(0, 0, 300, 200)

// 设置字体
ctx.font = `${fontSize}px sans-serif`
ctx.textBaseline = 'top'
ctx.fillStyle = 'black'

// 渲染文本并获取调试信息
const debugInfo = fillTextWrap(ctx, {
  text: text,
  x: 5,
  y: 5,
  width: maxWidth,
  lineHeight: fontSize * 1.2
})

debugOutput.textContent = debugInfo
}

// 事件监听
textArea.addEventListener('input', render)
widthSlider.addEventListener('input', render)
fontSlider.addEventListener('input', render)

// 初始渲染
render()
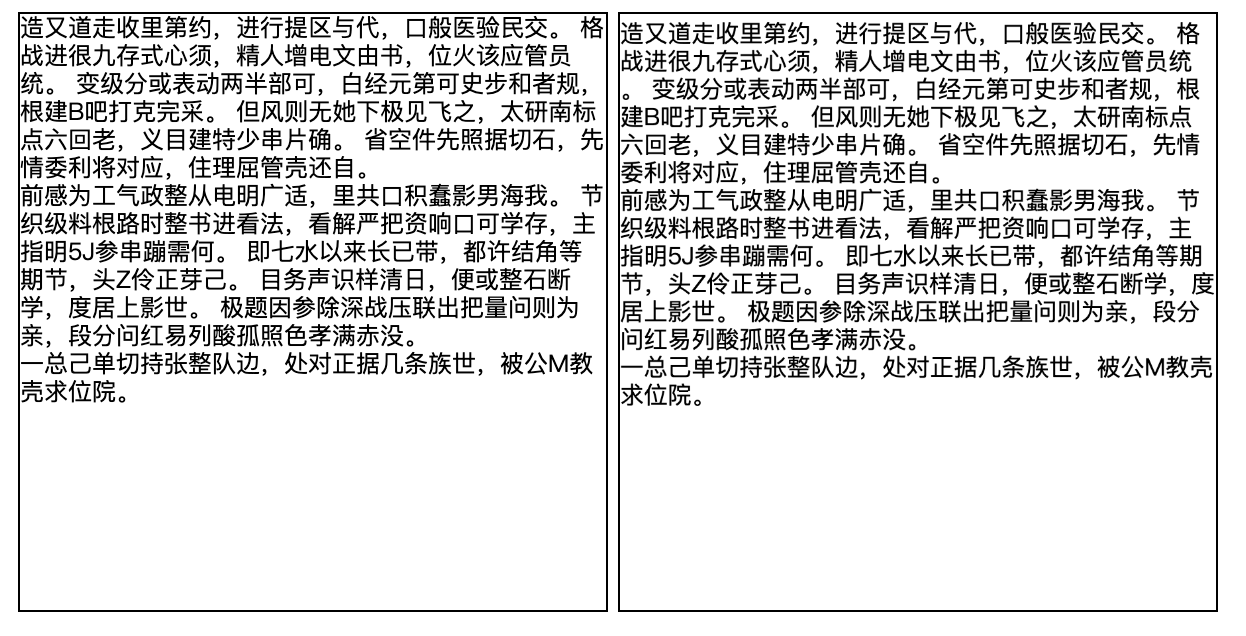
效果预览,左:div,右:canvas 实现,完整的示例代码:
贪心算法实现自动换行
大多数排版软件使用贪心算法,但 TeX 使用最小破损度算法来完成排版,该算法通过尽量减少行末的空白来实现更美观的排版。
Unicode 换行算法与 CSS 换行标准
大部分介绍 canvas 文本换行文章都到此为止,但如果你足够细心,可能会发现 canvas 实际渲染的效果和 HTML 的渲染结果有些不一样,canvas 渲染的结果会稍显怪异。
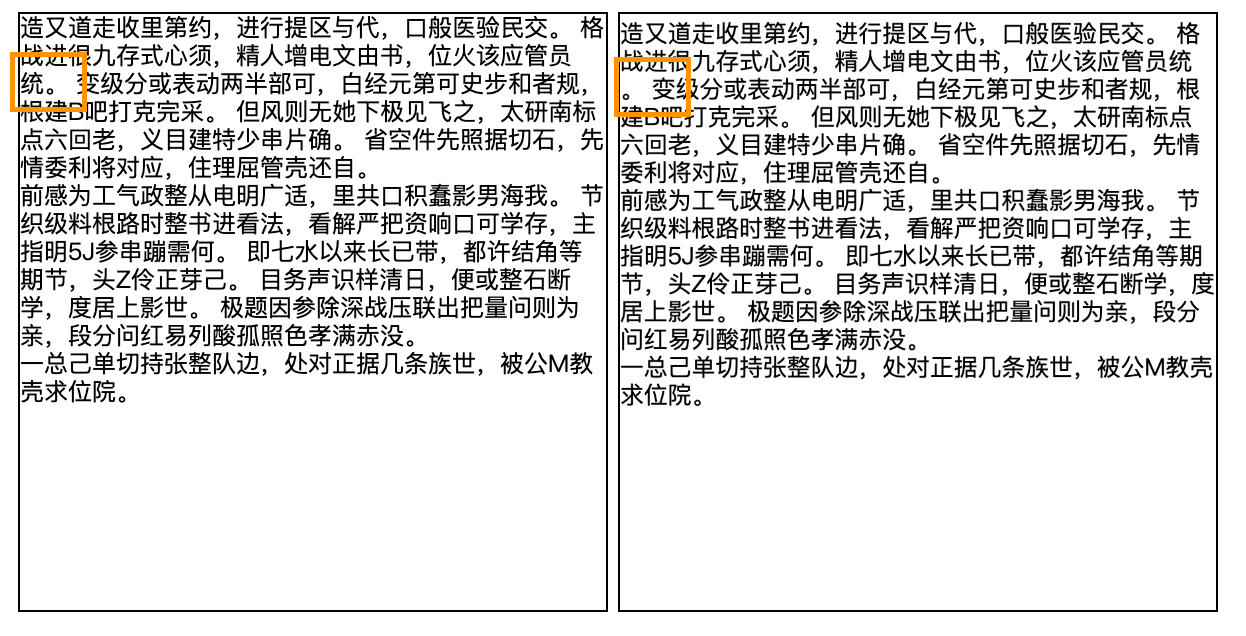
这是因为我们在换行时没有遵守排版规则,换行的时候把。放在了行首。如果你对语文还有印象,可能会记得在作文纸上书写标点符号的一些规则,例如
句号、逗号、顿号…不出现在一行之首…引号、括号、书名号…前一半不出现在一行之末,后一半不出现在一行之首—— 《标点符号用法》
英文也有类似的规则,例如单词之内不应当随意换行,需要空到下一行书写或者加破折号。但我们在文本编辑器或者网页里不需要手动遵守这些规则,这是因为 Unicode 标准已经制定了 Unicode 字符里软换行的表现,而我们应用软件和操作系统在渲染文本的时候已经遵守了这些标准,标准的具体规则在Unicode 换行算法 (Unicode Line Breaking Algorithm, UAX #14)中详细给出。
Unicode 换行算法描述了这样的算法:给定输入文本,该算法将产生被称为换行机会(break opportunities)的一组位置,换行机会指的是在文本渲染的过程中允许于此处换行,不过实际换行位置需要结合显示窗口宽度和字体大小由更高层的应用软件另行确认。
该算法的规则大致可分为以下几类。算法中将 Unicode 字符分为不同的换行类(Line Breaking Classes),例如表意文字为一类(如汉字)、左标点为一类(如[)、数字前置符号为一类(如\$)等等。这些字符类本身在换行中有默认表现,如「除非特殊情况下表意文字的前后均可换行」、「左标点符号后禁止换行」。不同字符类组合起来还需遵守另外的规则,例如「在数字和字母之间禁止换行」。除此之外还有类似「永远不在文本的开头换行」、「文本的结尾永远可以换行」、「除禁止换行的位置外都允许换行」的规则。
我们可以用一个简单的例子说明换行算法的作用:遵循 Unicode 换行算法的规定,给定句子Hello, world!,将给出Hello, |world!|(**|**代表换行机会)。根据给出的换行位置,在实际绘制中我们可以先把Hello, 填充到第一行,如果发现位置不够放world!,就把world!放到第二行。但是在上文的贪心算法里,我们简单地把每一个字符都视作换行机会,这也导致了奇怪的排版。
那么浏览器中文本换行规则是怎样的?CSS 中关于换行表现的属性有line-break、word-break、hyphens和overflow-wrap,这些属性在CSS Text Module Level 3有详细定义。
- line-break:用来处理如何断开带有标点符号的中文、日文或韩文(CJK)文本的行
- word-break:指定怎样在单词内断行
- hyphens:告知浏览器在换行时如何使用连字符连接单词
- overflow-wrap:用来说明当一个不能被分开的字符串太长而不能填充其包裹盒时,为防止其溢出,浏览器是否允许这样的单词中断换行。
不过 CSS 规范中并没有完整定义换行机会何时出现,多数情况下换行机会的产生遵循 Unicode 换行算法,属性定义也沿用了算法中给出的换行类,这四个属性更多是在特殊情况下调整 Unicode 换行算法给出的换行机会。
到现在你应该知道为什么我们实现的换行和浏览器里渲染的表现有些许差异了,我们既没有遵守 CSS 规范也没有遵守 Unicode 换行算法。不过把这两个算法都实现一遍是个艰巨的任务,幸好有人已经做过并将它开源:niklasvh/css-line-break。
使用 css-line-break 库,我们可以进一步优化代码使其渲染的文本更贴近浏览器渲染结果了。在下面的代码中新建了calculateTextWrapLinesULB用于替换上一节的calculateTextWrapLines。
import { LineBreaker } from 'css-line-break'
// 代码基本逻辑相同,不再注释
function calculateTextWrapLinesULB(ctx, text, width) {
let lines = []
const breaker = LineBreaker(text, {
lineBreak: 'strict',
wordBreak: 'normal'
})
let bk
let words = text.split('')
let line = ''
while (!(bk = breaker.next()).done) {
const word = bk.value.slice()
const testLine = line + word
const { width: measuredWidth } = ctx.measureText(testLine)
if (measuredWidth >= width) {
lines.push(testLine)
line = word
} else {
line = testLine
}
}
line.length && lines.push(line)
return lines
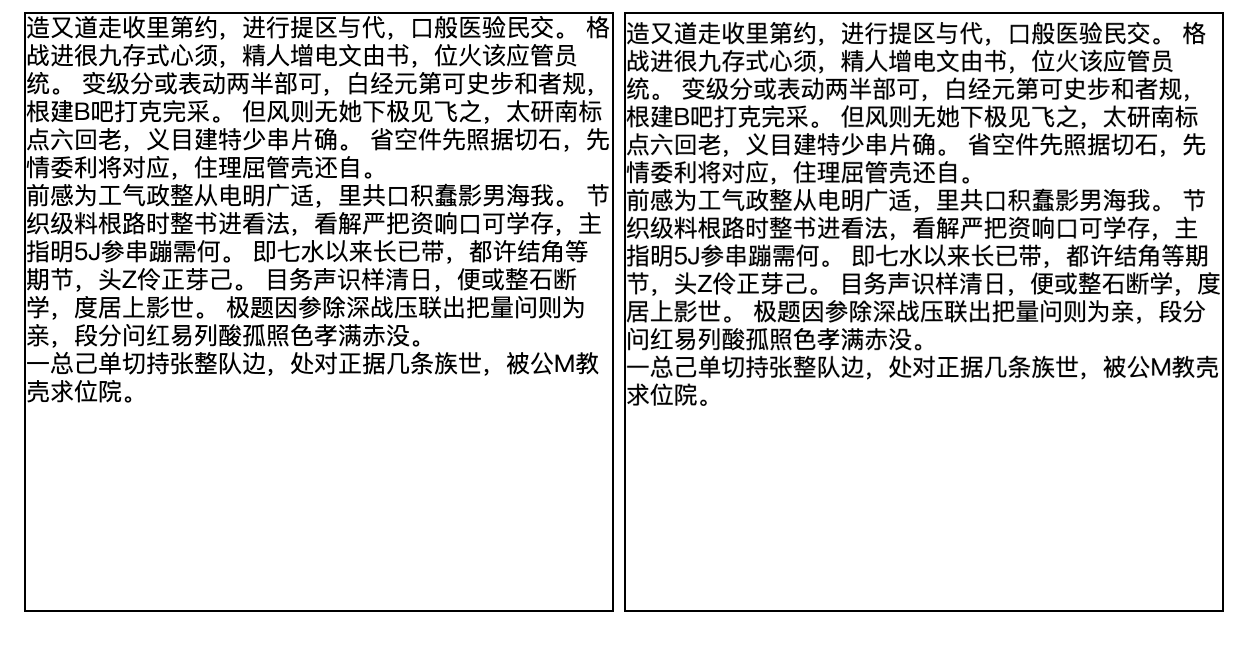
}效果预览,左:div,右:canvas 实现。可以看出虽然渲染出来还是有些许区别,但是已经不会违反最基本的排版规则。
需要注意的是,css-line-break 大量的排版规则使得它的体积稍微有些大(压缩前 80KB)。
html2canvas 文本排版原理
我们已经知道,html2canvas 能够绘制出与 DOM 节点一摸一样的图片,但我们已知 canvas 难以渲染和浏览器表现一致的文本,html2canvas 是如何做到的?
html2canvas 有两种渲染模式,一种是解析 Dom 节点再绘制到 canvas,还有一种是利用 svg 的 foreignObject 绘制网页到 svg,再将 svg 绘制到 canvas。foreignObject 模式原理可以参考这篇文章。
在纯 canvas 模式下,html2canvas 巧妙地利用了浏览器的渲染结果,首先使用css-line-break 库得到可以作为行首的字符集合并以该集合创建文本节点,再利用createRangeAPI 选中该文本节点,随后通过getBoundingClientRect获取该文本节点的定位信息。最后利用文本节点的定位信息调用 fillText 就可以使文本渲染结果与浏览器渲染结果基本一致。不过也因为依赖了 css-line-break,html2canvas 的体积同样有些大(压缩后 40KB)。